本文转载自liujason’s blog:https://www.liujason.com/article/775.html
前言
Railgun这个功能是CloudFlare的Biz以上订阅才有的功能哟!不过这个功能也下放给了CloudFlare Partner(CFP),所以可以联系愿意给Railgun权限的CFP索要激活token自己部署,来实现网站加速功能。典型网站案例:V2EX,效果还是很明显的。
Railgun简介(官方)
当内容快速变化或个性化时,其无法通过传统方式缓存,并且请求必须发送到源服务器进行处理。远离源服务器的访问者在更大程度上会受这些延迟的影响。
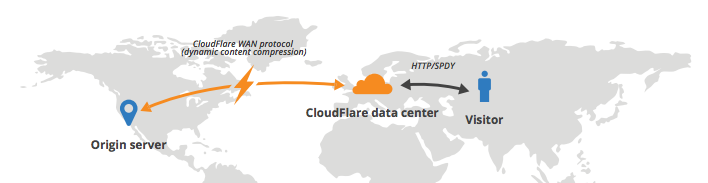
Railgun 通过压缩和 WAN 网络优化 Cloudflare 数据中心与源服务器之间的通信,来加速和保护动态内容的传递,从而加快无法直接从 Cloudflare 缓存提供的请求。
Railgun 通过以下方式缩短页面加载时间:
- 通过跟踪页面版本之间的差异(精确至字节)压缩内容,仅发送实际已更改的部分。
- 维护多个同步请求的单个持久连接,从而消除网络连接延迟。
- 缓存经常变化或个性化的动态内容。
Railgun 由两个软件组件组成:Listener 和 Sender。
Railgun Sender 安装在所有 Cloudflare 数据中心内,并与 Railgun Listener 保持连接。
Railgun Listener 通常安装在源服务器网络中您的 Web 主机上。它是在标准服务器上运行的一个小型软件,使用加密的二进制 Railgun 协议为来自 Cloudflare 的请求服务。
教程正文
原版教程点击这里查看:https://www.cloudflare.com/docs/railgun/installation.html
这里简化一下,直接放代码:
CentOS6
sudo rpm --import https://pkg.cloudflare.com/pubkey.gpg
sudo rpm -e gpg-pubkey-8e5f9a5d-*
sudo rpm -ivh http://pkg.cloudflare.com/cloudflare-release-latest.el6.rpm
vi /etc/railgun/railgun.conf
#修改以下字段
#activation.token = 找云筏要来的token
#activation.railgun_host = 本服务器的IP
systemctl enable memcached
systemctl start memcached
systemctl enable railgun
systemctl start railgun
#完成安装
CentOS7
sudo rpm --import https://pkg.cloudflare.com/pubkey.gpg
sudo rpm -e gpg-pubkey-8e5f9a5d-*
sudo rpm -ivh http://pkg.cloudflare.com/cloudflare-release-latest.el7.rpm
yum install railgun-stable -y
vi /etc/railgun/railgun.conf
#修改以下字段
#activation.token = 找云筏要来的token
#activation.railgun_host = 本服务器的IP
systemctl enable memcached
systemctl start memcached
systemctl enable railgun
systemctl start railgun
#完成安装
Debian9
echo 'deb http://pkg.cloudflare.com/ stretch main' |
sudo tee /etc/apt/sources.list.d/cloudflare-main.list
curl -C - https://pkg.cloudflare.com/pubkey.gpg | sudo apt-key add -
sudo apt-get update
apt-get install railgun-stable -y
nano /etc/railgun/railgun.conf
#修改以下字段
#activation.token = 找云筏要来的token
#activation.railgun_host = 本服务器的IP
systemctl enable memcached
systemctl start memcached
systemctl enable railgun
systemctl start railgun
#完成安装
Debian8
echo 'deb http://pkg.cloudflare.com/ jessie main' |
sudo tee /etc/apt/sources.list.d/cloudflare-main.list
curl -C - https://pkg.cloudflare.com/pubkey.gpg | sudo apt-key add -
sudo apt-get update
apt-get install railgun-stable -y
nano /etc/railgun/railgun.conf
#修改以下字段
#activation.token = 找云筏要来的token
#activation.railgun_host = 本服务器的IP
systemctl enable memcached
systemctl start memcached
systemctl enable railgun
systemctl start railgun
#完成安装
Ubuntu 16.04
echo 'deb http://pkg.cloudflare.com/ xenial main' |
sudo tee /etc/apt/sources.list.d/cloudflare-main.list
curl -C - https://pkg.cloudflare.com/pubkey.gpg | sudo apt-key add -
sudo apt-get update
apt-get install railgun-stable -y
nano /etc/railgun/railgun.conf
#修改以下字段
#activation.token = 找云筏要来的token
#activation.railgun_host = 本服务器的IP
systemctl enable memcached
systemctl start memcached
systemctl enable railgun
systemctl start railgun
#完成安装
Ubuntu 14.04
echo 'deb http://pkg.cloudflare.com/ trusty main' |
sudo tee /etc/apt/sources.list.d/cloudflare-main.list
curl -C - https://pkg.cloudflare.com/pubkey.gpg | sudo apt-key add -
sudo apt-get update
apt-get install railgun-stable -y
nano /etc/railgun/railgun.conf
#修改以下字段
#activation.token = 找云筏要来的token
#activation.railgun_host = 本服务器的IP
systemctl enable memcached
systemctl start memcached
systemctl enable railgun
systemctl start railgun
#完成安装
https://www.doublog.com/?p=1791